I moved again! This time with my German Shepherd, Viking, 1 gallon of trad mead, and three gallons of blackberry wine in a Jeep.
This is the first town I’ve lived in that has over 3,500 people in eight years. There’s a wee bit of culture shock to adjust to, now that traffic is more than three cars at a stop sign. I’m still blown away by the fact that I drive by not one, not two, but THREE markets on my way home from work.
Let’s be fair, compared with the Denver area, the Western Slope is still kinda small. For me, it’s big though. The best part though, is there’s a homebrew club here. I can start getting honest opinions on my mead so I can continue to improve. Local honey is easy to find too.
And hiking? Hiking!
As far as the state of the mead goes: the T’ej I wrote about last year turned out to be fairly drinkable. I need to run another batch with stems, because I don’t think the leaves will do the trick on their own. The blackberry wine from a few years ago has aged into a very pleasant port-style wine. Hopefully the three gallons that bounced around in my Jeep from Washington to Colorado will turn out the same way.
But moving wine in the front seat of a Jeep is not the best way to get good results, so we’ll see.
I have three new batches in secondary. All traditional, with three different honeys and two different yeasts. Once it stops hitting over 100 degrees, I’ll get a five gallon batch started. In bottles, there’s two left of the hibiscus, since most of those batches went to friends. I have one left of my spiced cyser and one left of blackberry wine.
Here’s a shout out to the American Mead Maker’s Association. Join for a year and you get some great monthly deals on honey to feed all your mead making needs.
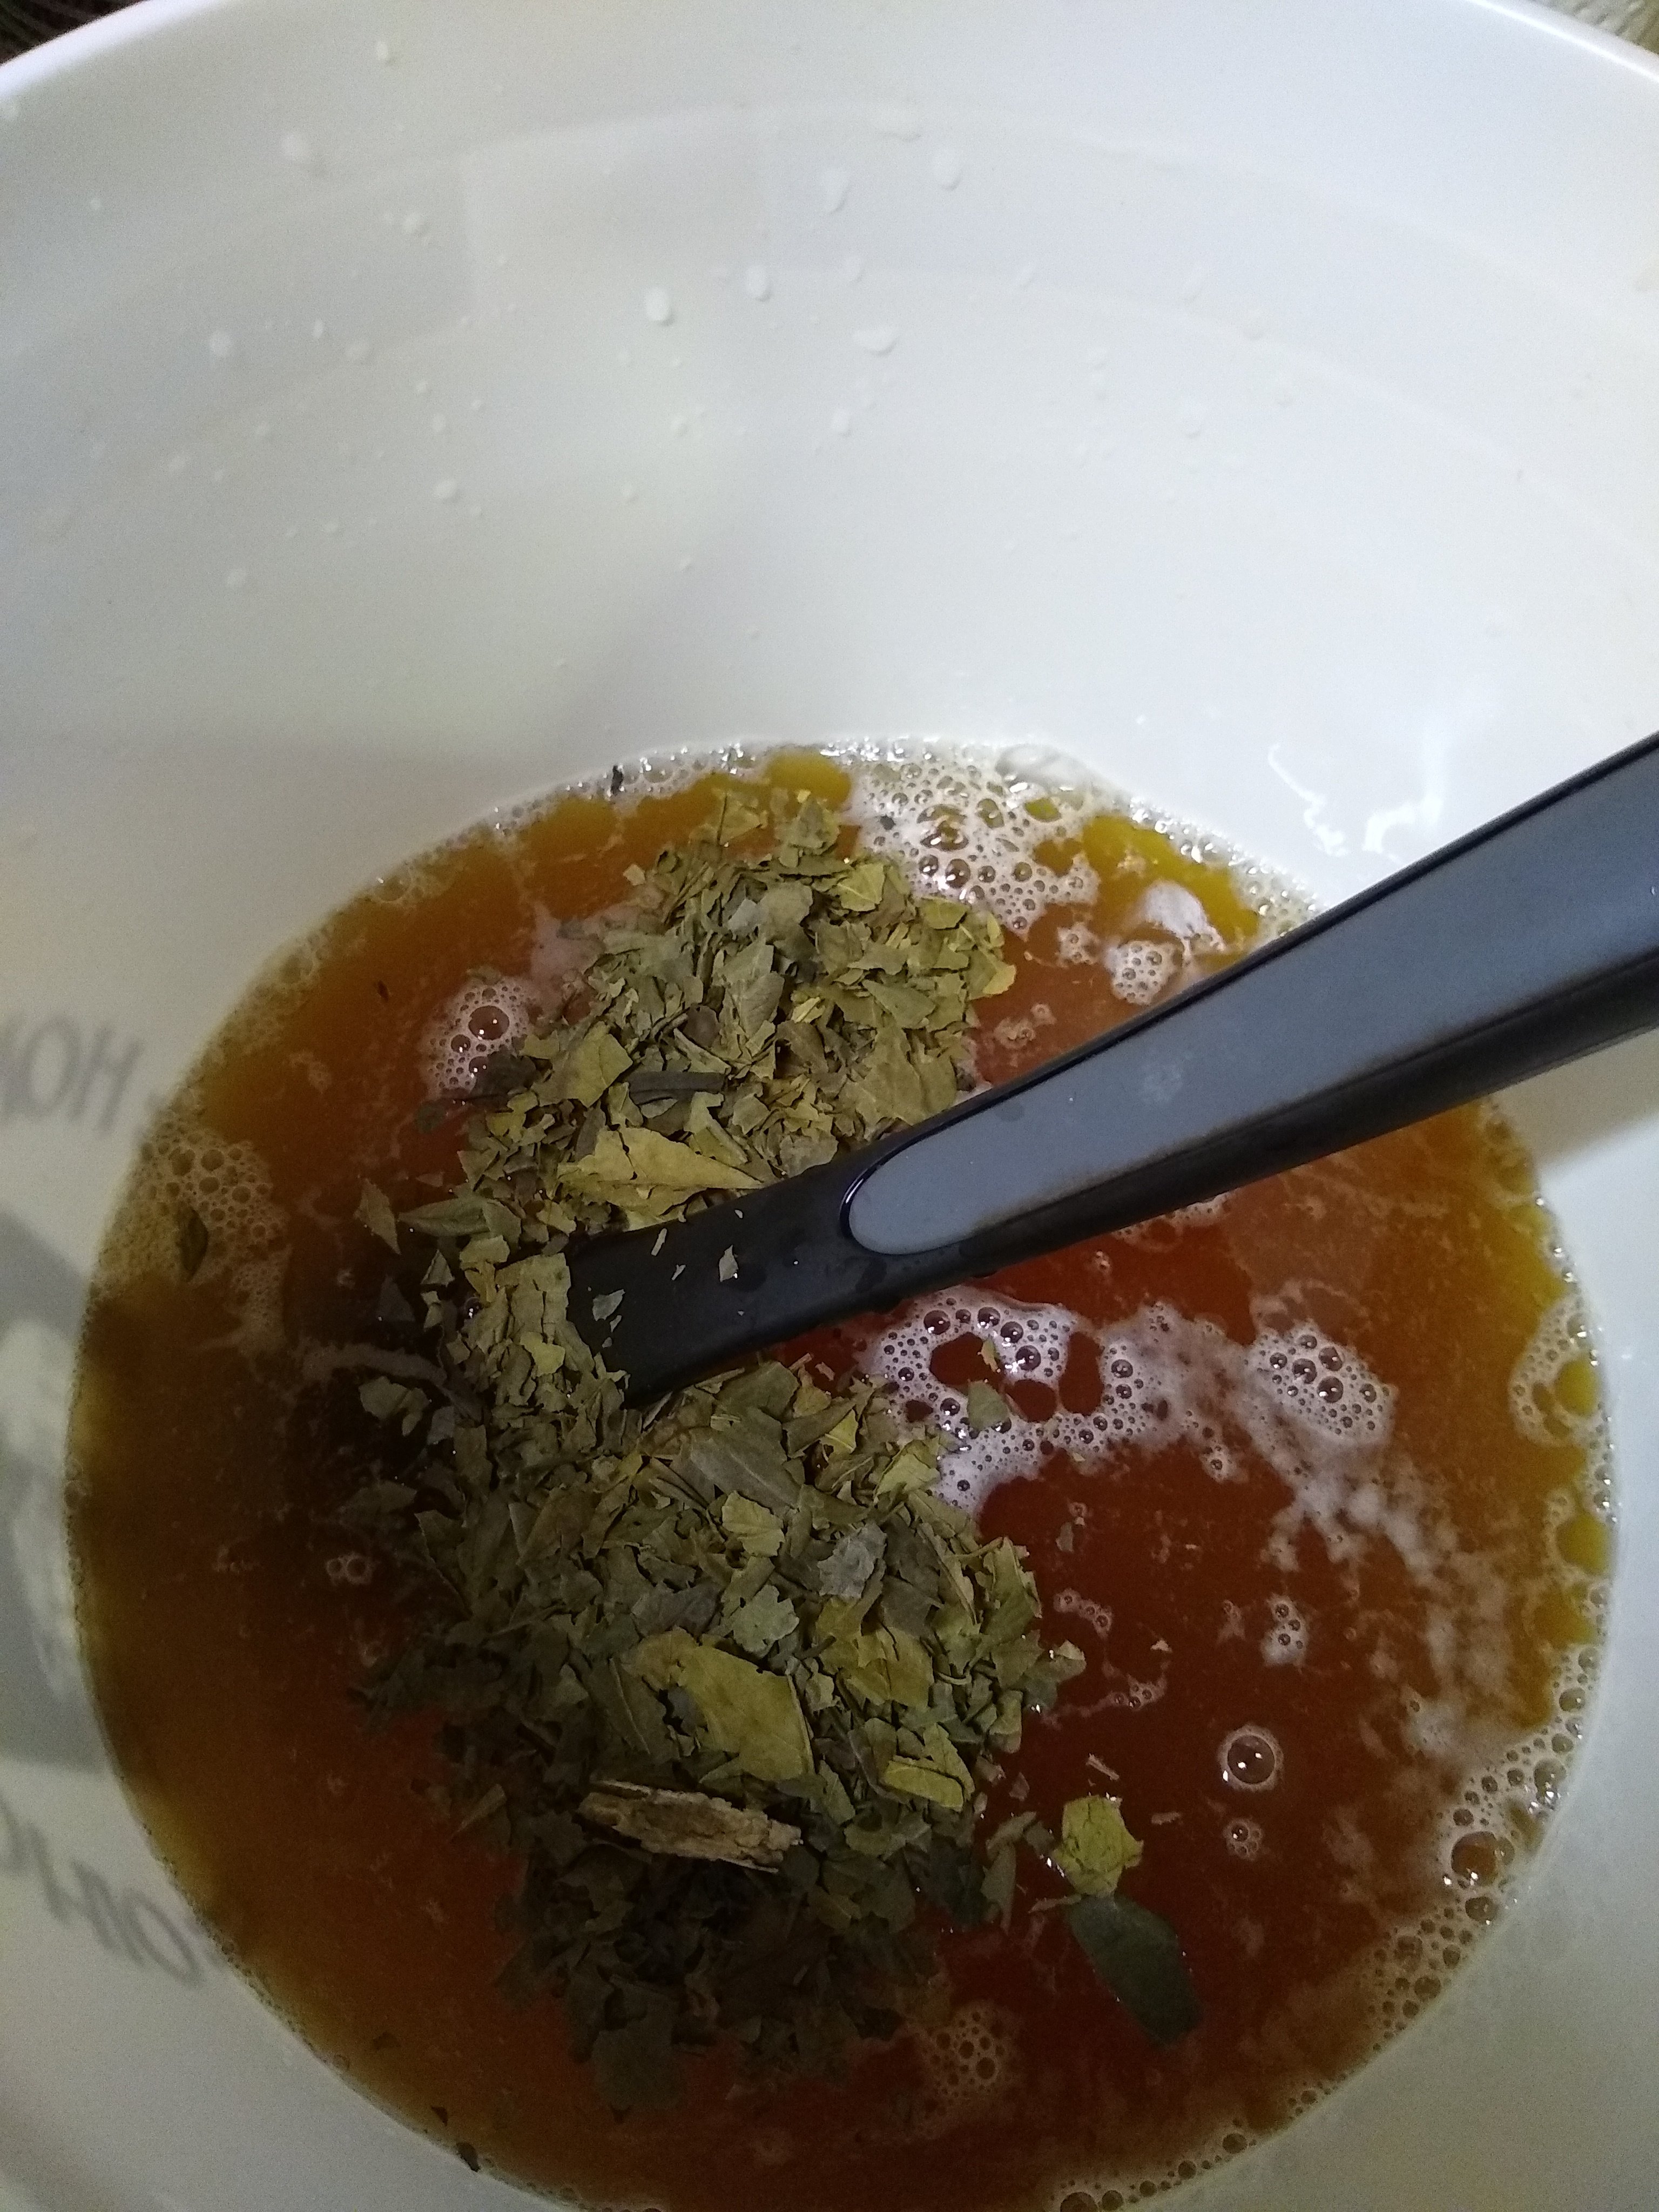
A couple years ago, I had some t’ej as part of a mead flight and I was hooked. My blackberry wine is still in primary, but I just moved the traditional to secondary this morning. Which, of course, left me with an empty fermenting bucket. I had some gesho leaves I bought a few months ago when I wanted to try making t’ej, and figured there’s no time like the present.
T’ej is traditionally made by relying on the yeasts on the gesho stems or leaves to start fermenting. You can certainly use commercial yeast if you want, and Kloman’s mead log recommends Lalvin D47. It’s a workhorse and a very reliable yeast if you want to go the commercial route. For my first batch, I chose to go with wild yeasts. We’ll see what happens and if it doesn’t ferment, I’ll add D47 later. This is the first brew I’ve made without commercial yeast.
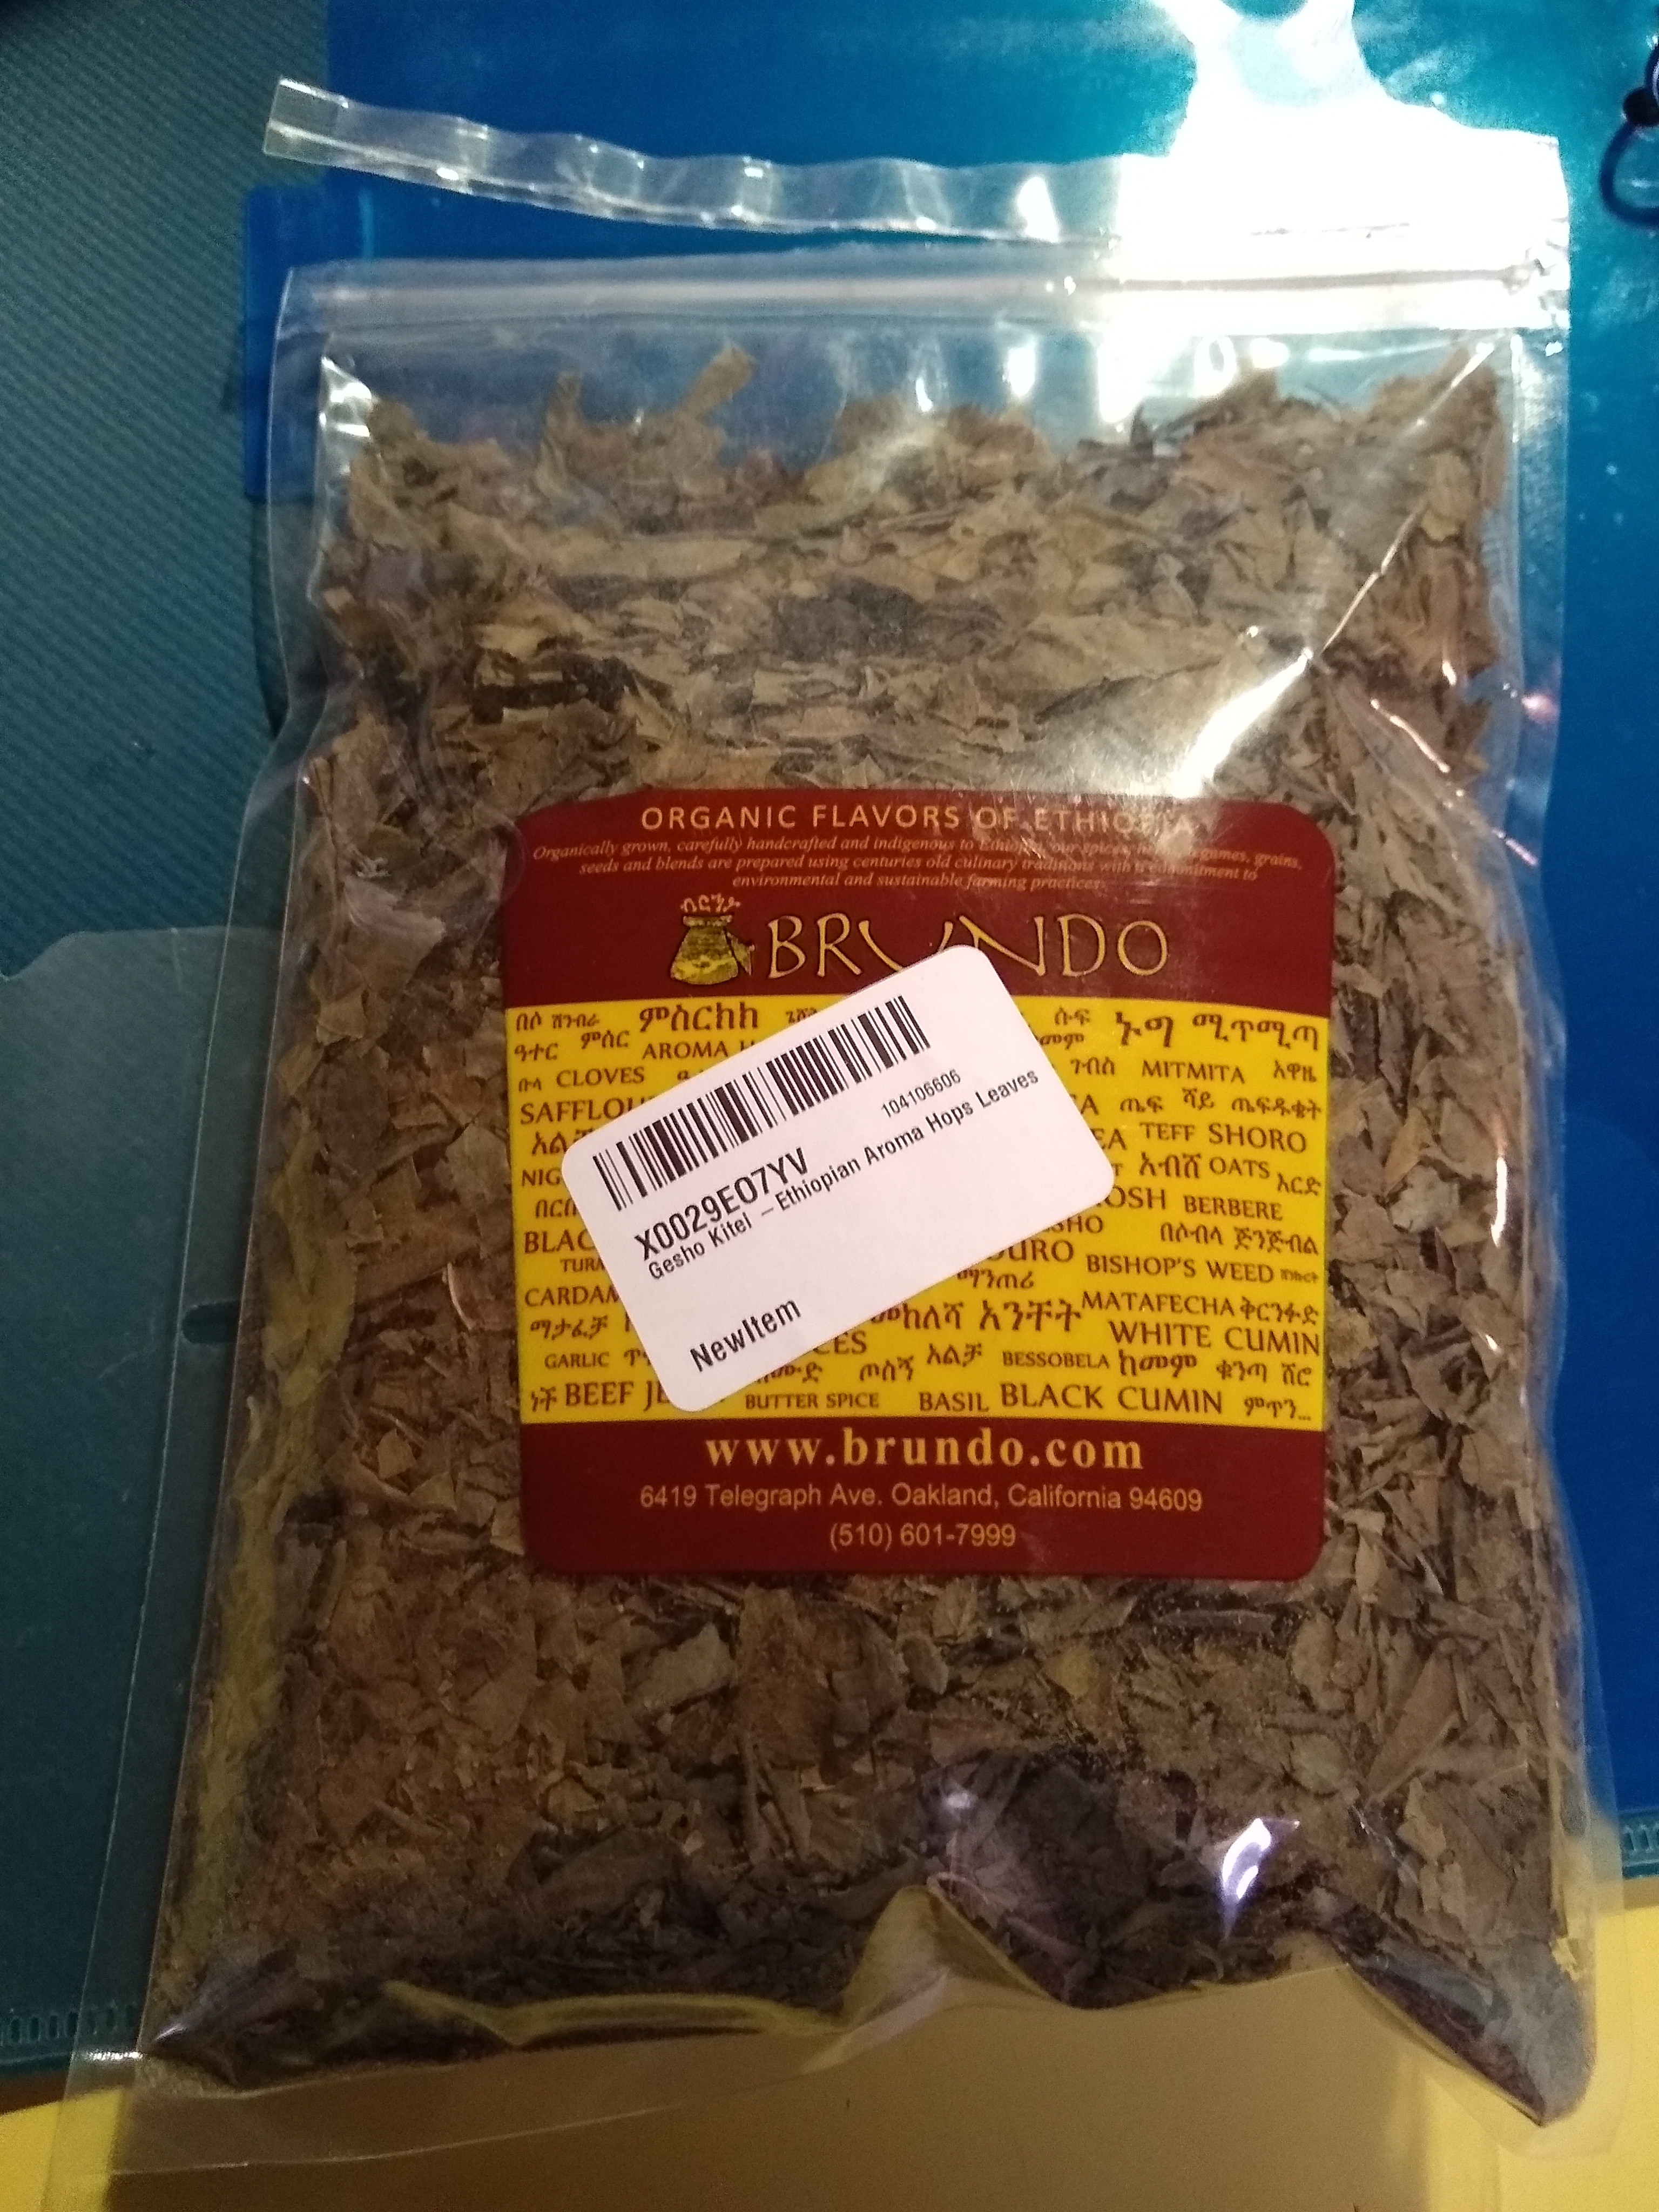
Gesho is the key ingredient in making T’ej, and comes from the shiny-leaf buckthorn tree (Rhamnus prinoides). The dried stems (inchet) and leaves (kitel) of this plant are what gives t’ej its distinct flavor. Gesho acts similarly to hops and adds a bittering flavor to the t’ej.
I bought leaves originally, and chose to use them today because- let’s be honest- they were here and I was impatient to get this batch started. Most recommendations are to use stems, so I’m planning a second batch when my order gets here at the end of April. I’ll compare the two and see how they differ.
Dried Gesho Leaves
As far as honey goes, I wanted to get a sweeter t’ej, and went for a higher SG. You could drop the honey to 2.5 lbs if you want less sweetness.
I’m following the guide laid out on Kloman’s log. I strongly recommend reading his blog, because it’s got a step by step guide and lots of excellent info. At 11 days, I’ll strain out the gesho leaves, and continue fermenting out to the four week mark.
After that, it should be ready to drink. I’ll probably bottle some, to see how it ages out. But since t’ej can be enjoyed as soon as it’s done fermenting, I plan on doing just that with some of this batch.
Links and resources:
Ethiopian T’ej: the t’ej recipe that I’m following. This blog has an extensive list of t’ej brewing tips, and the history and culture behind the drink.
The Seattle bar where I first tried T’ej, Capitol Hill cider, has flights and a tap/bottle list of over 200 ciders and meads. Their kitchen is entirely gluten free, so if you have Celiac’s or a gluten intolerance, it’s safe.
Ambrosia Honey– I found this at a co-op on my road trip, but they also sell on Amazon.
It’s fall! Tis the season for apple cider, Halloween, the end to cutting the grass, and did I mention apple cider?
Nothing better than a mug of fresh cider with a cinnamon stick and a shot of Kraken rum in it. Kraken is my main go-to for a dark rum, because it’s got good flavor and won’t break the bank. But if I want a post work ‘beer’- and I usually do- my go to is almost always hard cider. I prefer it to most beers, and there’s dozens of ciders being produced now. Thank you, 21st amendment, for fixing a big mistake. Thank you also One Tree, Spire Mountain, Blackthorn, Finn River, Two Towns, Incline, and the list goes on…. for making my life a bit tastier.
My Favorite
Hard apple cider dates back roughly 1300 years or so. If humans can grow it, and find a way to ferment it, we will. Back in the day, fermented drinks were sometimes safer to drink than your local water source, something I take to heart whenever I have problems with the well on my property. 1300 years ago, apples weren’t nearly as tasty as all the varieties we have today. So instead of eating them, people back then turned them into booze.
I live in the biggest apple producing state in the U.S., so finding fresh cider’s pretty easy in my area. The Pacific northwest in general is a huge cider and beer brewing area, and cider is taking off again in popularity. My local dive bar has one of its eight taps dedicated to ciders, which was a very nice surprise. It doesn’t have to be just apples either. Just like with meads, you can add fruits, herbs, and spices to hard cider for unique combinations. Two favorite ciders of mine use lemon, blackberries, basil, and hops as ingredients.
And just like mead, it’s possible to make your own hard cider. I haven’t tried it myself yet due to a lack of space. Someday. I’ve had some very tasty homebrew ciders though, and that’s more than enough to convince me to put it on my project list for the future. Preferably while I’m living in Washington, because foraging is easy here and plenty of folks are happy to let you pick apples in trade for some of the finished product.
Happy fall to everyone! If you have a favorite brand of hard cider, toss it in the comments.
What better to do with a lot of blackberries than turn them into wine? I have 23lbs set aside for booze, minus some I already turned into preserves. My recipe is based loosely off the one from the Wild Wines and Meads handbook, with a few adjustments. I prefer not to use orange juice or raisins in my meads (and now wines) as a rule. They do affect the flavor, and there are more neutral acids for use in wine making that you can use instead of fruit or raisin.
4lbs of blackberries per gallon (washing and freezing the fruit before brewing is recommended)
1 campden tablet per gallon (optional)
1 tsp of pectic enzyme per gallon
1 package of yeast (wine, or other- I’m using Lalvin KV-1116)
Yeast nutrient, 1 tsp per gallon
2 1/4 lbs of sugar (per gallon)
For yeast nutrients, I’m following the same procedure I use for my meads. Read about it here.
I have enough blackberries for three gallons of this, plus my mead experiment that I’ll be starting next week. And preserves, of course. I admit I was a bit lazy in berry picking with the blackberries, since allergies and a sinus infection kicked my ass. Still, I clocked in at 27lbs for the season.
Next year, I’ve got plans for a port style blackberry wine using this recipe. Unless I get impatient, in which case I’ll take the easy way out and use blackberry concentrate, or just go to Costco and load up a cart.
You can pick up the Wild Wines and Mead book by Pattie Vargas and Rich Gulling on Amazon and Indiebound.
This’ll be the first in a series of… well, shit. I actually started this mead on April 6th, but due to getting a garden started and some work shenanigans, I’m just now getting the blog series started.
This mead has 3.5 lbs of raspberry honey and was made with EC-1118 yeast. I used spring water, because my well water is a bit suspect right now. I don’t have to boil it, but I also don’t have much reason to trust it for mead making.
So, first step, get everything together. Now is the time to make sure you have the equipment that you need and to make sure it’s in working order before you start. Nothing says fun like getting everything set and discovering your only airlock has a crack in it the size of the San Andreas.
This is your mise en place (sue me, I’m watching Anthony Bourdain as I write this post). Honey, yeast, primary fermenter (2 gal food grade plastic bucket), sanitizer, hydrometer, thermometer, 1 gallon of spring water, a large pot, a small dish for starting yeast, stirring spoon, airlock, and the test tube for testing OG. Don’t forget whatever you’re drinking while you’re starting your batch of mead. Also, paper towels or dish towels for the inevitable spills.
101 Honey and Yeast
The honey had started to crystallize, which is normal. I made it a hot water bath and let it start to de-crystallize again. While it was in the hot water bath, I sanitized my equipment and cleaned the kitchen. I do have two dogs, and the last thing I want is a stray dog hair in the mead. My go-to is Star-San. Most local brew shops carry it, and if they don’t, Amazon does.
After the honey was liquidized, I added it to 1/2 gallon of water, heated to 105 deg, but not boiling. I don’t follow the philosophy of boiling the must (honey+water mixture), because boiling can affect the honey’s flavor. Honey itself is not prone to infection, so as long as you sanitize your equipment, use an airlock, and keep everything clean while brewing, you’re good. You’d pretty much have to let your dog drink out of the must to introduce bacteria for an infection, and I kept my two out in the yard during brewing.
Wash your hands. Sanitize your gear. And don’t sweat it too much.
Then I aerated it while this was going on:
Activating Yeast
I do make sure I match temperatures as closely as possible with the yeast and the must. Follow the instructions on the back of your yeast packet for temperature and how long to let it activate before tossing it into your must.
Full disclosure: I did have one batch that I started, and right before I was ready to start dealing with the yeast, work pinged. So I tossed the yeast into the must on the off chance that it would work without being activated first, ran out the door, and 24 hours later it was merrily fermenting away. Thank you Lalvin, that batch turned out nicely.
But for this batch, I followed the instructions. Then I tossed the activated yeast into the must and aerated again after adding more spring water to bring the total volume up to a starting gravity of 1.12. You won’t use the entire gallon of water for a 1 gallon batch. Also, don’t worry if your mead is a bit over one gallon, you’ll lose some volume during racking. And tasting as the batch moves along.
If you start at just over a gallon, you have a better chance of ending primary fermentation at one gallon due to the volume loss from racking. You want to minimize headspace (the open air at the top of your carboy) during secondary fermentation. Air is Kryptonite for meads once they’re done primary, so do whatever you can to minimize it. The less headspace the better.
Future Mead
You need to get your OG (original gravity). Your OG will be the baseline for the 1/3 sugar break and also for calculating the ABV of your finished mead. This mead started at 1.12, which will yield a very sweet mead. The yeast for this batch has an alcohol tolerance of up to 18%. That’s one reason why I’m planning on a minimum of a year for this batch. 4-6 weeks in primary, followed by months in secondary.
As far as feeding this batch went, I used Fermaid K on the second day of fermentation, because of the high original gravity and the likelihood that the yeast would need a kick in the ass to keep fermenting. I don’t always feed my brews if I’m going for a lighter, less sweet, less alcoholic mead. I also don’t feed my brews if I’m throwing something into primary before going out of town for a week. Or if I’m feeling lazy.
The Tonsa method is what I do use when I feed meads. It really is a good method. Here’s the link.
While the 101 batch is fermenting, I’ll be starting a couple of other batches, so that I have something to drink while this one is brewing. Stay tuned for updates when this batch goes into secondary, tasting notes throughout brewing, and bottling over the next year.
Some random tips:
If you live in a hot area, you can leave the honey in a hot car for a while instead of messing around with a water bath.
Fuck raisins. Seriously. If you’re going to feed your mead, pick a yeast food that won’t affect the final flavor. Yes, a lot of recipes call for them, but I’m an opinionated asshole about raisins and about the fact that boiling your honey/water mixture is a bad idea. Also, if you’re starting at a higher OG and going for a sweet mead, you should feed your yeast to keep them happy. Stuck fermentations do happen and honey itself doesn’t have enough nutrients to keep yeasts happy all of the time.
If you do go with a specialized honey, like some random awesome shit that came from a roadside stand or your neighbor gave you, keep some in reserve for backsweetening if you have to later on.
Don’t stress too much. As long as you keep an airlock on, keep your work space clean, and keep your gear sanitized, it’s fairly difficult to get an infection started in a batch, or introduce wild yeasts or bacteria to your must while you’re starting a batch.
Aeration is not evil in the first part of primary, but it’s absolutely something you don’t want in secondary or when you bottle. Make sure you sanitize whatever is going into your must, every time. Secondary is the stage where you need to be careful about not aerating your must and making sure you don’t introduce anything weird into your mead.
If you have too much headspace in your carboy for secondary, sanitize a bunch of marbles and drop them in to bring your mead up close to the top of the carboy. They won’t affect the flavor, but they will help protect your mead.
Got Mead has a calculator that comes in handy. Use this for all of your calculations, it takes out a good bit of the guesswork.
Google search different methods of making mead. There’s a literal ton of them, and if my methods make you cringe because there’s a good bit of winging it, there will be something more precise out there that you can use.
You can pick up a wine making kit that has pretty much everything you need. Get a hydrometer (for measuring OG and SG) if the kit doesn’t have it. Always, always buy extra airlocks, even if you don’t live 2 hours away from your closest brew shop like I do.
It’s entirely possible to make a 1 gallon batch by taking 3 lbs of honey, and tossing it into a sanitized bucket with yeast and water, shaking it, and leaving it in a room to cook for a while. I’m sure there’s some purists that will happily try to kick my ass for saying that, but mead isn’t rocket science, especially if you’re just making something fun to drink and not going for a competition mead. You can get as technical as you want, and you’ll likely get more technical as time goes on and you try to fine tune your meads, but to start with? Go ahead and get the last packet of yeast on the shelf, a few pounds of honey from Costco, and a food grade bucket. Go to town. Make some booze.
Finally, I want to throw up a recommendation for the folks at UBrew/ Planet Natural in Bozeman, Montana. Go check them out. They have a great selection and great customer service too. They do online orders if you’re not local.